 Connect
Click to Connect to a database
 Reconnect
Click to reconnect to a database.
Application Toolbar Contents:
Database Connection / Log-On Push-Buttons:
These Push-Buttons are associated with Log-On and Database connection operations.
Click to Connect to a database
Click to reconnect to a database.
Maintenance Push-Buttons (Left Hand Side)
These Push-Buttons are associated with Adding, Changing and Deleting the current record. They appear on the Left Hand side of the Toolbar. (There may be a similar set of Maintenance Push-Buttons appearing on the Right Hand Side of the Toolbar relating to grid table entries).

Click to clear the Application's current record values.
Click to clear the Application's current record values.
The following Maintenance Push Buttons are subject to these mutually exclusive rules:
- If the current record ID does not exist on the database then the Add Push-Button will be visible.
- If the current record ID exists on the database and the fields on the screen have not been changed, then the Delete Push-Button will be visible.
- If the current record exists on the database and the fields on the screen have been changed, then the Change Push-Button will be visible.
- If the record ID has not yet been entered and the Auto-Key option is valid for this entity / Application, then the Auto-Key will be visible.

Click to Add a new record to the database.
Click to Change an existing record in the database.

Click to Delete an existing record from the database.

If clicked it will tag a record's ID field for automatic value generation during the
finalising Add action.
- The Auto-Key function is used to automatically generate unique, next sequential ID field values.
- The formats of Auto-Key values are bespoke, site specific and available only on nominated tables.
- Refer to the System Administrator for a site's Auto-Key availability.
- Tables nominated for Auto-Key'd records can contain both manually determined and Auto-Key'd IDs.
- The Auto-Key toolbar button appears when adding new ID records to nominated tables and is used as follows:
- Click the Application Toolbar Button: Auto-Key.
- A hash (#) symbol will appear as a temporary tag in the ID field to be auto generated.
- The Application Toolbar Button: Auto-Key will be replaced by the Application Toolbar Button: Add.
- After completing all other fields required for the record, click the Application Toolbar Button: Add.
- The system will now auto-generate the ID field with a value 1 greater that the highest previous record.
Maintenance Push-Buttons (Right Hand Side)
These Push-Buttons are usually associated with individual lines within a Table Grid. On selection (double clicking), the line is expanded into it's individual fields for easier maintenance. (There may be a similar set of Maintenance Push-Buttons appearing on the Left Hand Side of the Toolbar relating to the current record).
Click to clear the selected Table Item line entry fields.
Click to clear unused Table Item lines.
Click to clear data from Table Item lines.
The following Maintenance Push Buttons are subject to these mutually exclusive rules:
- If the current line is not on the Table Grid then the Add Push-Button will be visible.
- If the current line is on the Table Grid and the fields on the screen have not been changed, then the Delete Push-Button will be visible.
- If the current line is on the Table Grid and the fields on the screen fields have been changed, then the Change Push-Button will be visible.
Click to Add a new line to the Table Grid.
Click to Change a line in the Table Grid.
Click to Delete a line from the Table Grid.
Click to overlay an enlarged view of the Table Grid.
Click to return to normal view of the Table Grid.
GST Push-Buttons:
The following 2 Push-Buttons are used on Transaction applications for Generating and Wiping GST amount lines:
Click this Push-Button to create GST amount lines for each non-GST transaction line.
Click this push button to remove all GST amount lines.
On-Charge Push-Buttons:
The following 3 Push-Buttons appear in On-Charge related applications.
This Push-Button will appear when a transaction is available for On-Charging.
This Push-Button will expand a transaction's charge lines over the property's Lease Hierarchy.
This Push-Button will apply an On-Charge Profile over a transaction's Lease Hierarchy.
Process Push-Buttons:
The following 3 Push-Buttons appear in applications which contain an embedded Process.
This Push-Button will appear when the required fields have been entered and the process
is ready for Starting. Click to Start the process.
This Push-Button will appear when the process has been started by the Start Push-Button.
Click to prematurely Stop the process.
This Push-Button will appear when the process has completed and a Report Log has been
created. After reviewing, click to reset the Report Log.
Asset Push-Buttons:
The following Push-Buttons are associated with Asset Maintenance tasks:
When a Measure has been applied to the Asset, clicking this will navigate to the Asset
Management Profile window.
Clicking this will populate the Component Property details with the main Asset Property
details.
Clicking this will synchronise and auto-calculate interdependent Asset Component
fields.
Budget Preparation Push-Buttons:
The following Push-Buttons are associated with Budget Preparation tasks:
Clicking this will start the Lease Charge Projection process.
Clicking this will populate previous year columns on Budget Preparation screen.
Click to apply COA Profile for Budget Preparation
Clicking this will select the required rows from the Budget Preparation screen.
Clicking this will populate records on the Budget Preparation screen.
Clicking this will copy the Budget Preparation data to the Budget screen.
Clicking this will copy the Budget Preparation data to the Forecast screen.
Clicking this will copy the Budget data to the Forecast screen.
CRM Communication Push-Buttons
The following Push-Buttons are associated with CRM communication tasks:
Create, cross-reference and send an E-Mail
Place and cross-reference a Phone Call.
Create, cross-reference and record a Meeting notification.
Create, cross-reference and send an SMS.
Create, cross-reference and record a Note.
Click to see the full details of the communication task.
Click to preview an E-Mail before sending.
Click to send an E-Mail.
Click to add an Attachment to an E-Mail.
Click to delete an Attachment from an E-Mail.
Click to open an Attachment on an E-Mail.
Search Push-Button:
The ![]() Search Push Button and it's associated components are fully described in Searching for Entities
Search Push Button and it's associated components are fully described in Searching for Entities
Click to call the Search function.
Toggle this to include / exclude Archived records.
Click to populate the table of entities related to a particular search field and filters.
Click to return multiple selected records to the parent application.
Reporting Push-Buttons:
The following Push-Buttons appear within reporting applications:
Click to Print a Report.
Click to View a Report on screen.
Click to Schedule a Report.
General Push Buttons:
Click to call the Allocation Transaction screen.
Click to call the Invoice screen.
Click to call the Purchase Order screen.
Click to call Default ID.
Click to dishonour a Receipt or Payment transaction.
Click to call Diary entries related to this entity.
Click to create an entity related E-Mail.
Click to export a generated file.
Click to export a Diary entry.
Click to export a Contact.
Click to export a Report to a file.
Click to export and open a Report in an external application.
Click to access Files related to this entity's ID value.
- Before clicking this button, the record's ID field needs to have been entered.
- When clicked, the standard Microsoft Windows files browser will open.
- Select the file for display.
Click to run a Final process (usually after a Trial).
Click to Finalise a procedure.
Click to call the Geocode application.
This is used to find Latitude / Longitude values for a given address.
Click to go to related screens.
A screen may contain identifier (ID) fields other than itself. Their related Maintenance
screens may be called by clicking the appropriate visible GoTo push button. The icons
on GoTo push buttons are stamped with an ">" arrow. This push button may also be accompanied by a Hierarchy "V" arrow. Click this to display a Property's hierarchy. The one shown here is the Section GoTo.
Click to select Help functions.
Click to not accept.
Click to call the Lease Option Profile application.
Click to call the Owner Distribution Profile application.
Click to call the Percentage Rent Profile application.
Click to preview the results of a process.
Click to initiate a Process operation.
Click to process a Lease Review.
Click to process the Budget COA Profile application
Click to use a pre-existing Purchase Order as a starter for a transaction.
Click to call the Purchase Order Allocation screen.
Click to process the Outgoings Profile application.
Click to create the Budget Trial data.
Clicking this will copy the Budget Preparation data to the Budget screen.
Click to create the Accrual Trial data.
Clicking this will copy the Accruals Preparation data to the Accrual screen.
Click to call the Purge Diary Entries application.
Click to call the Diary Recurrence application.
Click to run a Repair function.
Click to call the Lease Review Profile application.
Click to select Reports available for a particular application.
Depending on the application, ID field contents may further define the Report selection.
Click to undo a previous action / process.
Click to initiate a Search.
Click to process a Selection.
Click to use an Application's current record as the basis for creating another with
similar values.
- After locating an exiting record:
- Click the Template push button.
- The window will refresh showing the Application Toolbar Button: Add.
- All values , particularly the ID field, unique to the source, will have been removed.
- After supplying / changing the fields required for the record, click the Application Toolbar Button: Add.
- A new record based on the Template will be created.
Click to run a Trial process (usually before a Final).
Click to create Word Mail Merge Letters.
Click to use a pre-existing Work Order as a starter for a Purchase Order.
Click to accept.
Navigational Push Buttons:
Annexe Property Level
Asset
Bond Account (Creditor or Debtor)
Building Property Level
Land Property Level
Lease Property Level
Lease Account (Landlord or Tenant)
Occupant
Owner
Section Property Level
Suite Property Level
Sundry Account (Creditor or Debtor)
Transaction
Trust Account (Creditor or Debtor)
Dashboard Push Button:
- Drop down list of Dashboard Components.
- Associated Add push-button.
Component contents are normally refreshed each time they are loaded.
However, activity in other parts of the system may affect a Component.
Clicking this button will update the Component content.
Click this button to open the Settings screen relating to the Component.
 Change
 Wipe
Wipe Wipe Unused
 Amount Reset
 Add
Add Change
 Delete
 Expand
 Shrink
 Auto GST
 Wipe GST
 On-Charge
 Select
 Apply
Apply Start
Start Stop
Stop X Report
 Measure
 Default
 Calculate
 Start
Start Calculate
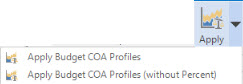 Apply
Apply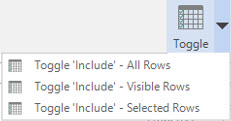 Toggle
 Select
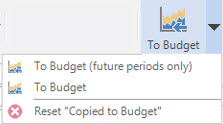 To Budget
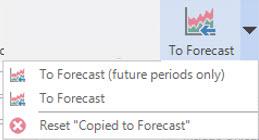 To Forecast
 Copy
Copy E-Mail
 Phone Call
 Meeting
 SMS
SMS Note
Note Auto Preview
 Preview
 Send
Send Add
Add Delete
 Open
Open Search
 Archived
 Select
 Print
Print View
View Schedule


 Default
 Dishonour
 Diary
Diary E-Mail
 Export
 Export
 Export
 Disk
Disk Application
 Files
Files Final
Final Finalise
 Geocode
 GoTo>
GoTo> Help
Help No
No Option
 Distribution
 Percentage Rent
 Preview
 Process
 Process Review
 Budget COA
 Purchase Order
 Purchase Order Allocation
 Outgoings
 Budget Trial
 To Budget
 Accrual Trial
 To Accrual
 Purge
Purge Recurrence
 Review
 Reports
 Rollback
 Select
 Template
 Trial
Trial Word Mail Merge
 Work Order
 Yes
Yes
 Asset
Asset Bond Account
 Building
 Land
Land Lease
Lease Lease Account
 Occupant
 Owner
Owner Section
 Suite
Suite Sundry Account
 Trust Account
 Add Dashboard Component
 Refresh Component
 Maintain Component